
Command Bars: Menu Bars, Toolbars, and Shortcut Menus
In Microsoft Access 97, the internal workings of menu bars, shortcut menus, and toolbars have been unified into a single object called a command bar. Because they share the same underlying technology, you have more flexibility when you customize existing Microsoft Access menu bars, toolbars, and shortcut menus, and when you create new ones for your application.
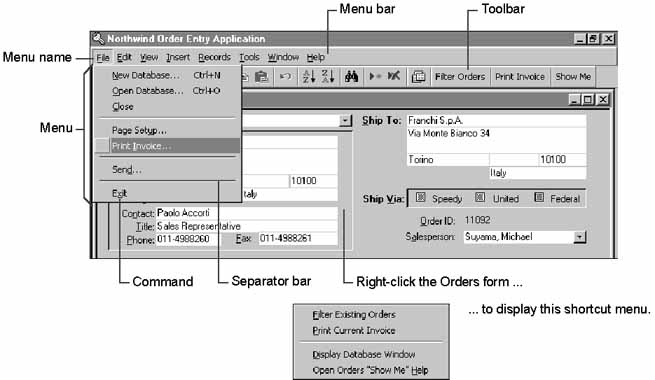
Menu bars and toolbars are two ways to present commands on command bars: a menu bar typically presents drop-down menus of commands as text, and a toolbar typically presents commands as buttons. A shortcut menu is a subset of a menu bar, presenting one menu of commands when a user right-clicks most objects and controls in Microsoft Access. You can create new shortcut menus and associate them with the forms, reports, or controls in your application.
Because menu bars, toolbars, and shortcut menus share the same internal workings, you can use most of the same controls on all three. For example, in addition to their typical controls, a top-level menu bar can use buttons, a drop-down menu can use combo box controls, and a toolbar can use drop-down menu buttons that display text-only commands. In this respect, command bars can be too flexible. Avoid confusing the users of your application by putting menu bar and toolbar controls in unusual locations or configurations. Instead, model your custom command bars after the ones used in Microsoft Access.
The simplest way to work with command bars is by using the Customize dialog box (View menu, Toolbars submenu). You can use the Customize dialog box to customize existing command bars or to create new ones. New command bars can contain existing commands or new commands that run the event procedures or macros you define.
By default, users can customize command bars. Users can also make menu bars and toolbars free-standing by dragging them into the work area, or they can dock them to the sides or the bottom of the work area. In addition, users can resize or hide menu bars and toolbars. You can prevent users from customizing all command bars in your application in the Startup dialog box (Tools menu). You can prevent users from customizing, moving, or resizing an individual menu bar or toolbar by setting options in the Toolbar Properties dialog box, which is available from the Customize dialog box.
You can also use the objects, methods, and properties of the CommandBars collection in Visual Basic code to create and work with command bars.
See Also For more information, see "Working with Command Bars in Code" later in this chapter.
Changes to existing command bars are always stored in the Windows Registry in the \HKEY_CURRENT_USER\Software\Microsoft\Office\8.0\Access\Settings \CommandBars key. When you create a new command bar, it is saved in a system table in the current database and is only available in that database. However, if you create an add-in database and store new command bars in it, they are available from any installation of Microsoft Access that has the add-in installed.
Once you have customized an existing menu bar or toolbar, or created a new one, you can attach it to a form or report by specifying it in the MenuBar or Toolbar property for the form or report. To attach a shortcut menu to a form, report, or control, specify it in the ShortcutMenuBar property for the form, report, or control. You can also specify a global menu bar or a global shortcut menu to be available throughout your application by using the Startup dialog box (Tools menu).
Note Previous versions of Microsoft Access use the AddMenu and DoMenuItem actions in macros to create custom menu bars and shortcut menus and to carry out standard Microsoft Access menu commands. If you convert a database created in a previous version of Microsoft Access to Microsoft Access 97, the macros that contain the AddMenu and DoMenuItem actions will still run; however, Microsoft Access 97 converts DoMenuItem actions in the macros to the new RunCommand action. For more information on the RunCommand action, search the Help index for "RunCommand action."
Although these menu bar macros created with a previous version of Microsoft Access will run from the forms, reports, or controls they are attached to, they won't be available in the Customize dialog box. However, you can create a Microsoft Access 97-style menu bar or shortcut menu from a menu bar macro created in a previous version of Microsoft Access. For more information on how to do this, search the Help index for "macros, using to work with menus."
Creating New Menu Bars, Toolbars, and Shortcut Menus
You create all command bars, whether they are menu bars, toolbars, or shortcut menus, by using the Customize dialog box (View menu, Toolbars submenu). You create the different kinds of command bars by setting their properties and, if necessary, by setting properties for the commands within them to control how they appear and behave. The following procedures show how to create new menu bars, toolbars, and shortcut menus.
Creating New Command Bars and Setting Their Properties
The first step in creating a new menu bar, toolbar, or shortcut menu is to create and name an empty command bar, set its type, and set other properties that control how it can be used.
 To create an empty command bar and set its properties
1 On the View menu, point to Toolbars, and then click Customize.
2 On the Toolbars tab, click New.
3 In the Toolbar Name box, type a name for the new command bar, and then click OK.
Microsoft Access creates an empty, floating command bar, which you can specify to be a toolbar, menu bar, or shortcut menu.
4 In the Customize dialog box, click Properties to display the Toolbar Properties dialog box.
5 In the Type box, click the kind of command bar you want to create:
 To create a menu bar, click Menu Bar.
To create a toolbar, click Toolbar.
To create a shortcut menu, click Popup.
Note The Popup setting of the Type property is used for a shortcut menu because in the command bar object model, menus (on both menu bars and toolbars), submenus, and shortcut menus are all of this type. However, if a command bar has its Type property set to Popup, the Customize dialog box user interface only allows you to work with it as a shortcut menu. Additionally, as soon as you set a new command bar's Type property to Popup, it disappears because a shortcut menu can't display as free-standing. To add commands to your custom shortcut menu, you must display it. For more information, see "Adding Menus and Submenus to Command Bars" later in this chapter.
6 If you are creating a menu bar or toolbar, in the Docking box, click the kind of docking you want to allow. These settings don't apply to shortcut menus.
|
To |
Click | |
|
Allow users to dock the menu bar or toolbar both horizontally and vertically |
Allow Any | |
|
Prevent users from changing how the menu bar or toolbar is docked |
Can't Change | |
|
Allow users to dock the menu bar or toolbar horizontally only |
No Vertical | |
|
Allow users to dock the menu bar or toolbar vertically only |
No Horizontal |
7 Clear the following check boxes whose default behavior you want to change.
|
To |
Clear this check box | |
|
Prevent users from making changes to the command bar by using the Customize dialog box |
Allow Customizing | |
|
Prevent the new command bar from appearing on the Toolbars submenu (View menu) |
Show On Toolbars Menu |
8 If you are creating a menu bar or toolbar, clear any of the following check boxes whose default behavior you want to change. These settings don't apply to shortcut menus.
|
To |
Clear this check box | |
|
Prevent users from changing how a menu bar or toolbar is docked |
Allow Moving | |
|
Prevent users from showing or hiding the menu bar or toolbar |
Allow Showing/Hiding | |
|
Prevent users from resizing the menu bar or toolbar |
Allow Resizing |
9 When you are finished specifying properties for the new command bar, click Close. To continue working with your new command bar, leave the Customize dialog box open.
At this point, you have an empty command bar of the type you specified in step 5. If you created a menu bar, you need to add menus to it and then add commands to those menus. If you created a shortcut menu, you need to add commands to it. If you created a toolbar, you need to add buttons or other controls to it.
Adding Menus and Submenus to Command Bars
If you are creating a menu bar, you must add and name top-level menus, and then add commands to those menus. If you want an additional menu to open from a menu command, you can add a submenu to it. You can also add menus and submenus to toolbars, and submenus to shortcut menus.
Note In previous versions of Microsoft Access, you had to add a single top-level menu to create a shortcut menu. This is not necessary in Microsoft Access 97.
To add a menu or submenu to a command bar
1 If the Customize dialog box isn't open, point to Toolbars on the View menu, and then click Customize.
2 If the menu bar, toolbar, or shortcut menu you want to work with isn't displayed, open it.
Note To display a custom shortcut menu, select the Shortcut Menu check box in the Toolbars list of the Customize dialog box. On the Shortcut Menu toolbar, click Custom and then click the name of your custom shortcut menu.
3 In the Customize dialog box, click the Commands tab.
4 In the Categories box, click New Menu.
New Menu appears in the Commands box.
5 Drag New Menu from the Commands box to your menu bar or toolbar:
To create a top-level menu, drag New Menu to the top row of your menu bar or toolbar.
To create a submenu, you must have an existing top-level menu, or you must be adding a new menu to a shortcut menu. Drag and hold New Menu over a top-level menu (or shortcut menu) until it drops down, then drag New Menu to the location you want and release the mouse.
6 Right-click New Menu on your menu or toolbar, and then type the name for your menu in the Name box.
Tip You can create an access key for your menu names so that users can access your menus with the keyboard. To do so, type an ampersand (&) in front of the letter you want to use. For example, to use F as the access key for a menu named File, type &File. The F in your menu name is underlined and users can open the menu by pressing ALT+F.
7 To further customize your new menu or submenu, set other properties in the Control Properties dialog box. To display the Control Properties dialog box, right-click the new menu or submenu, and then click Properties.
See Also For more information on the settings in the Control Properties dialog box, see "Setting Properties for Command Bar Controls" later this chapter.
Once you have added all the menus and submenus to your command bar, you have the basic framework to contain the commands that you want to be available. If you are creating a menu bar, you have top-level menus and perhaps some submenus. If you are creating a toolbar, you may have added top-level menu buttons and possibly submenus within them. If you are creating a shortcut menu, you may have added submenus. The next step is to add commands to your menus and submenus, or buttons that carry out commands to your toolbar.
Adding Existing Menu Commands, Buttons, and Other Controls to Command Bars
By using the Customize dialog box, you can add any existing Microsoft Access menu command, toolbar button, or other control to your new command bar. This includes all standard Microsoft Access menu commands and toolbar buttons, as well as drop-down combo box controls, such as the Font box, and special formatting controls, such as the Fill/Back Color and Special Effect controls.
To add an existing Microsoft Access menu command, button, or other control
1 If the Customize dialog box isn't open, point to Toolbars on the View menu, and then click Customize.
2 If the menu bar, toolbar, or shortcut menu you want to work with isn't displayed, open it.
3 In the Customize dialog box, click the Commands tab.
4 In the Categories box, click the category that contains the menu command, button, or other control you want to add to your command bar. For example, to add a command that appears on the File menu, click File. To add an entire menu of commands at once, click Built-in Menus.
5 Drag the menu, menu command, button, or other control you want from the Commands box to the appropriate location on your command bar.
To add the command or control to a menu or submenu, drag it and hold the mouse over the menu or submenu name until it drops down, and then drag the command or control where you want it on the menu or submenu and release the mouse.
Note If you place the command or control in the wrong location, you can drag it to the correct location.
6 To further customize your command bar, you can change the images that appear on toolbar buttons and next to menu commands, and you can set other properties that determine how your menu commands, buttons, and other controls appear and work. To display a menu of customization options, right-click the menu command, button, or control.
See Also For more information, see "Working with Button Images on Command Bars" and "Setting Properties for Command Bar Controls" later in this chapter.
Adding Custom Menu Commands and Buttons to Command Bars
There are three ways to add menu commands and buttons that perform custom actions to a command bar. You can:
Add a menu command or button that opens a table, query, form, or report.
Create a macro and then add a menu command or button to run the macro.
Create a Visual Basic Function procedure, and then add an existing menu command or button and customize it to run the Function procedure.
Creating a Command or Button That Opens a Database Object
To create a command or button that opens a table, query, form, or report, drag the name of the database object from the appropriate category in the Customize dialog box to your command bar.
This method is equivalent to opening the object from the Database window; you can't specify additional parameters such as the mode in which Microsoft Access opens the object, and you can't perform other actions when opening the object. If you want to specify additional parameters or perform a series of actions when opening an object, you must create a macro or a Visual Basic Function procedure and add it to your menu or toolbar, as described later in this section.
To add a custom command or button that opens a database object
1 If the Customize dialog box isn't open, point to Toolbars on the View menu, and then click Customize.
2 If the menu bar, toolbar, or shortcut menu you want to work with isn't displayed, open it.
3 In the Customize dialog box, click the Commands tab.
4 In the Categories box, click the category for the type of object you want to open: All Tables, All Queries, All Forms, or All Reports.
5 Drag the object you want to open from the Commands box to the appropriate location on your command bar.
To add the command that opens the object to a menu or submenu, drag it and hold the mouse over the menu or submenu name until it drops down, and then drag the command where you want it on the menu or submenu and release the mouse.
Note If you place the command in the wrong location, you can drag it to the correct location.
6 To further customize your command bar, you can change the images that appear on toolbar buttons and next to menu commands, and you can set other properties that determine how your menu commands and buttons appear and work. To display a menu of customization options, right-click the menu command or button.
See Also For more information, see "Working with Button Images on Command Bars" and "Setting Properties for Command Bar Controls" later in this chapter.
Creating a Command or Button That Runs a Macro
To create a command or button that runs a macro, create the macro, and then drag its name from the Customize dialog box to your command bar. For example, you can create a macro that uses the OpenForm action to open a form and set the Data Mode argument to Add. Add the macro to a menu, and when a user clicks the custom command, Microsoft Access runs the macro, opening a blank form ready to add a new record.
To add a custom command or button that runs a macro
1 Create a macro that performs the action you want.
See Also For information on creating macros, search the Help index for "macros, creating."
2 If the Customize dialog box isn't open, point to Toolbars on the View menu, and then click Customize.
3 If the menu bar, toolbar, or shortcut menu you want to work with isn't displayed, open it.
4 In the Customize dialog box, click the Commands tab.
5 In the Categories box, click All Macros.
6 Drag the macro you want to run from the Commands box to the appropriate location on your command bar.
To add a command that runs the macro to a menu or submenu, drag it and hold the mouse over the menu or submenu name until it drops down, and then drag the command or control where you want it on the menu or submenu and release the mouse.
Note If you place the command in the wrong location, you can drag it to the correct location.
7 To further customize your command bar, you can change the images that appear on toolbar buttons and next to menu commands, and you can set other properties that determine how your menu commands and buttons appear and work. To display a menu of customization options, right-click the menu command or button.
See Also For more information, see "Working with Button Images on Command Bars" and "Setting Properties for Command Bar Controls" later in this chapter.
Creating a Command or Button That Runs a Visual Basic Function Procedure
For the greatest flexibility, you can create a Visual Basic Function procedure and run it from a menu command or toolbar button. To do so, add the Custom command to your command bar, and then customize it to run your Function procedure.
Important You can run only Visual Basic Function procedures from a command bar, not Sub procedures.
To add a custom command or button that runs a Visual Basic Function procedure
1 Create a Visual Basic Function procedure that performs the action you want.
See Also For information on creating Function procedures, search the Help index for "Visual Basic code, Function procedures."
2 If the Customize dialog box isn't open, point to Toolbars on the View menu, and then click Customize.
3 If the menu bar, toolbar, or shortcut menu you want to work with isn't displayed, open it.
4 In the Customize dialog box, click the Commands tab.
5 In the Categories box, click File and then drag the Custom command from the Commands box to your command bar.
6 Right-click the new command on your menu or toolbar, and then click Properties.
Microsoft Access displays the Control Properties dialog box.
7 In the Caption box, delete the current name, and type the new name for your command.
Tip You can create an access key for your command so that users can access it with the keyboard. To do so, type an ampersand (&) in front of the letter you want to use. For example, to use I as the access key for a Print Invoice command, type Print &Invoice. The I in your command name is underlined and users can carry out the command by pressing ALT+I.
8 In the On Action box, type an expression to run your Visual Basic Function procedure. The expression must use the following syntax: =functionname(). For example, to run a function named PrintInvoice, you'd type =PrintInvoice().
9 To further customize your command bar, you can change the images that appear on toolbar buttons and next to menu commands, and you can set other properties that determine how your menu commands and buttons appear and work. To display a menu of customization options, right-click the menu command or button.
See Also For more information, see "Working with Button Images on Command Bars" and "Setting Properties for Command Bar Controls" later in this chapter.
Working with Button Images on Command Bars
Most Microsoft Access command bar controls have a button image that is displayed when the control is on a toolbar, and sometimes appears next to the control when it's on a menu. You can customize these button images by:
Changing the image to one of a set of predefined images.
Copying a control's image and pasting it into another control.
Copying an image from a graphics program and pasting it into another control.
Editing the image by using the Button Editor dialog box.
Whether a control appears with a button image, text, or both is determined by the setting of the control's Style property and by whether the control is on a toolbar or a menu. The following table describes how the Style property works.
Note A control's Caption property text is identical to the text in the Name box on the shortcut menu that appears when you right-click a control while the Customize dialog box is open.
|
Style property setting |
What appears on a menu |
What appears on a toolbar |
|
Default Style |
Button image and Caption property text |
Button image only |
|
Text Only (In Menus) |
Caption property text only |
Button image only |
|
Text Only (Always) |
Caption property text only |
Caption property text only |
|
Image And Text |
Button image and Caption property text |
Button image and Caption property text |
Note By default, some Microsoft Access command bar controls don't have a button image associated with them and won't display an image regardless of the Style property setting. However, you can add an image by using one of the methods described in the following procedure. Also, some Microsoft Access command bar controls have their Style property set to Text Only (In Menus) by default so that they don't display their image on menus. If you want to display the image on menus, set the Style property to Default Style.
See Also For information on setting the Style property and other command bar control properties, see "Setting Properties for Command Bar Controls" later in this chapter.
To customize a button image on a command bar control
1 If the Customize dialog box isn't open, point to Toolbars on the View menu, and then click Customize.
2 If the menu bar, toolbar, or shortcut menu that contains the control you want to work with isn't displayed, open it.
3 Do one of the following.
|
To |
Do this | |
|
Use a predefined button image |
Right-click the control, point to Change Button Image, and then click the image you want. | |
|
Copy and paste another control's button image |
Right-click the control that has the image you want to use, and then click Copy Button Image. Right-click the control whose image you are customizing, and then click Paste Button Image. | |
|
Copy and paste an image from a graphics program |
Open the image you want to copy in a graphics program. Select and copy the image (preferably a 16 x 16 pixel image or portion). Switch back to Microsoft Access. Right-click the control, and then click Paste Button Image. | |
|
Edit the control's current button image |
Right-click the control, and then click Edit Button Image. In the Button Editor dialog box, you can change the color and shape of the image, adjust the image's position on the control, and preview your changes to the image. When you have finished editing the button image, click OK. | |
|
Reset a control to use its original button image |
Right-click the control and then click Reset Button Image. |
4 When you have finished working with the button image, click Close.
Setting Properties for Command Bar Controls
Microsoft Access provides some additional menu and control properties that you can use to further customize menus, menu commands, and toolbar buttons. You set each of these properties in the Control Properties dialog box.
Note Depending on the kind of control you're working with, some properties will not be available.
To set control properties for a menu, a menu command, or a toolbar button
1 If the Customize dialog box isn't open, point to Toolbars on the View menu, and then click Customize.
2 If the menu bar, toolbar, or shortcut menu that contains the control you want to work with isn't displayed, open it.
3 Right-click the control, and then click Properties.
4 In the Control Properties dialog box, set the properties you want. The following table describes each property.
|
Property |
Description | |
|
Caption |
The name that is displayed for the command. This is identical to the text entered in the Name box on a menu or control's shortcut menu. | |
|
Shortcut Text |
The text that is displayed next to a menu command and that indicates its shortcut key; for example, CTRL+P. This property only creates display text to prompt the user. To define the shortcut key, you must create an AutoKeys macro as described in "Making Key Assignments" later in this chapter. | |
|
ToolTip |
The text of the ToolTip that appears when a user rests the pointer on the control. If this setting is blank, Microsoft Access uses the text from the Caption property as the ToolTip. | |
|
On Action |
The name of a macro or Visual Basic Function procedure that runs when a user clicks the control. When using a Function procedure, you must enter the name of procedure as an expression, using the syntax =functionname(). | |
|
Style |
Controls how a command is displayed. The Style property settings are also available from a control's shortcut menu. See Also For information on the Style property, see "Working with Button Images on Command Bars" earlier in this chapter. | |
|
Help File |
The help file that contains the What's This Tip topic specified by the Help ContextID property. | |
|
Help ContextID |
The context ID of the topic to display as a What's This Tip for this command. | |
|
Parameter |
An optional string associated with the control that your application can reference or set. For example, the Visual Basic Function procedure specified in the On Action property can refer to the Parameter property to determine how it works, or the Parameter property can be used to store information about the control, much like the Tag property. The Parameter property isn't generally used by built-in menu and toolbar controls. However, the Parameter property for a menu command or toolbar button used to add an ActiveX control is set to the ActiveX control's class identifier(CLSID), which is the Registry value that uniquely identifies that control. If you delete or modify the CLSID, the command or button won't work. Similarly, the Parameter property for a menu command or toolbar button used to open a particular database object is set to the name of the object. | |
|
Tag |
An optional string that can be used later in event procedures. | |
|
Begin A Group |
Select this check box to indicate the beginning of a group of controls. On menus, a separator bar appears above a command that has this property set. On toolbars, a vertical separator bar appears in front of the command. If you resize a floating toolbar and the entire group of controls doesn't fit on the current line, the whole group is bumped to a new line. |
You can also set and read each of the properties in Visual Basic code. Most of the corresponding Visual Basic property names are the same as those listed in the preceding table, although the words are concatenated; for example, ShortcutText property. There are two exceptions: the Visual Basic properties that correspond to the ToolTip and Begin A Group properties in the Control Properties dialog box are ToolTipText and BeginGroup.
See Also For more information on creating and customizing command bars, search the Help index for "toolbars" or "menus."
Importing Custom Command Bars
If you want to use the custom command bars from one application in another application, you can import them. You cannot import a single custom command bar; you must import all the custom command bars in an application. However, Microsoft Access doesn't import command bars that have the same name as existing command bars.
To import all custom command bars from another application
1 Open the application into which you want to import the custom command bars.
2 On the File menu, point to Get External Data, and then click Import.
3 In the Import dialog box, select the application that contains the command bars you want to import, and then click Import.
4 In the Import Objects dialog box, click Options.
5 Select the Menus And Toolbars check box, and then click OK.
Using Custom Menu Bars and Shortcut Menus
You can use custom menu bars and shortcut menus in your application in three ways:
Attached to a form or report Microsoft Access displays your custom menu bar whenever you open the form or display the report in Print Preview.
As a shortcut menu attached to a form, a control on a form, or a report Microsoft Access displays your custom menu whenever you right-click the form, control, or report it's attached to.
As your application's global menu bar Microsoft Access displays your custom menu bar in all windows, except in forms or reports that have their own custom menu bar. (A form or report's custom menu bar overrides a global custom menu bar.)
Attaching a Custom Menu Bar to a Form or Report
The easiest way to create a menu bar that's attached to a form or report is to create a new menu bar and then specify that menu bar in the form or report's MenuBar property, so Microsoft Access displays the menu bar whenever the form or report is active.
To attach a custom menu bar to a form or report
1 Create a custom menu bar as described earlier in this chapter.
2 Open the form or report in Design view.
3  On the toolbar, click Properties.
4 In the MenuBar property box, enter the name of the menu bar you created in step 1.
You can attach the same menu bar to more than one form or report.
Attaching a Custom Shortcut Menu to a Form, a Control on a Form, or a Report
You can attach custom shortcut menus to a form, a control on a form, or a report. After you create the shortcut menu, set the ShortcutMenuBar property for the form, control, or report to the name of the shortcut menu. Microsoft Access displays the custom shortcut menu whenever a user right-clicks the form, control, or report.
To attach a custom shortcut menu to a form, a control on a form, or a report
1 Create a custom shortcut menu as described earlier in this chapter.
2 Open the form or report in Design view.
3 Click the form, control, or report to which you want to attach a custom shortcut menu.
4 On the toolbar, click Properties.
5 In the ShortcutMenuBar property box, enter the name of the shortcut menu you created in step 1.
You can attach the same shortcut menu to more than one form, control, or report.
Specifying a Global Menu Bar or Shortcut Menu
You can specify a menu bar to use throughout your application by using the Startup dialog box.
To specify a global menu bar to display when your application starts
1 Create a custom menu bar as described earlier in this chapter.
2 On the Tools menu, click Startup.
3 In the Menu Bar box, enter the name of the menu you created in step 1.
4 Click OK.
The next time you start your application, Microsoft Access displays your custom menu bar instead of the default menu bar.
You can change the global menu bar while your application is running, without having to restart your computer. To do so, set the MenuBar property of the Application object to the name of the menu bar.
See Also For more information on specifying global menu bars in Visual Basic, search the Help index for "MenuBar property."
Using Custom Toolbars
You can use one or more custom toolbars in an application. Create the toolbars you want, and then use the appropriate method to display your custom toolbars:
If your application has only one custom toolbar, simply use the Toolbars command (View menu) to display it and it will appear each time your application starts.
If your application has different custom toolbars for different forms or reports, you can specify a toolbar for each form or report in the form or report's Toolbar property.
If you need to work with more than one custom toolbar for a form or report, or if you want to hide or show Microsoft Access built-in toolbars, you can use the Visible property of the CommandBar object in Visual Basic code or the ShowToolbar action in macros to hide and show the toolbars.
If you want your application to display only custom toolbars, you can hide all built-in toolbars by clicking the Startup command (Tools menu) and clearing the Allow Built-in Toolbars check box.
 Attaching a Custom Toolbar to a Form
When using the Orders application, Northwind sales representatives want to click a button on the toolbar to print the invoice for the current order. You can create a custom toolbar for the Orders form with a button that prints invoices, and use the custom toolbar instead of the built-in toolbar.
Step One: Create the custom toolbar Create a custom toolbar for the Orders form that includes a button that runs the PrintInvoice macro, as well as any other commands you want to provide, such as the Cut, Copy, and Paste commands in the Edit category of the Customize dialog box (View menu, Toolbars submenu). Name this toolbar Orders Form Toolbar.
Note The custom toolbar attached to the Orders form in the Orders sample application includes a Design View button. You can use this button to easily switch between Form view and Design view while you're looking at the sample application. However, if you don't want users to switch to Design view in your own application, don't put the Design View button on your custom toolbars.
Step Two: Set the form's Toolbar property to the name of the custom toolbar Open the Orders form in Design view, open the property sheet for the form, and then enter Orders Form Toolbar in the Toolbar property box.
Note There is no need to create event procedures for the Activate and Deactivate events of the form to show and hide toolbars as was required in previous versions of Microsoft Access. Setting the Toolbar property to a custom toolbar automatically hides the built-in Form View toolbar when your form is opened, and hides your custom toolbar when a user closes the form or switches to another form.
Preventing Users from Customizing Your Application's Command Bars
You can control whether users can add or remove commands on all of the menus and toolbars in your application.
To prevent users from customizing all command bars in an application
1 On the Tools menu, click Startup.
2 In the Startup dialog box, clear the Allow Toolbar/Menu Changes check box.
3 Click OK.
The next time your application starts, users won't be able to add or delete menu or toolbar commands. However, users will still be able to move and resize toolbars.
Note If you want to prevent users from customizing an individual command bar, you can clear the Allow Customizing check box in the Toolbar Properties dialog box. For more information, see "Creating New Command Bars and Setting Their Properties" earlier in this chapter.
Working with Command Bars in Code
You can work with menu bars, toolbars, and shortcut menus in Visual Basic code by using the properties and methods of the CommandBars collection and the objects associated with it. In the command bars object model, each menu is a CommandBar object. This is true of menus and submenus on all three types of command bars. For example, to refer to the Tools menu on the standard menu bar, use the following statement:
CommandBars!Tools
The following code uses the Add method and several command bar control properties to add a new, hidden Print Invoice command to the bottom of the Tools menu.
Private Sub AddInvoiceCommand()
Dim cb As CommandBar, ctl As CommandBarControl
' Set a reference to the Tools menu.
Set cb = CommandBars!Tools
' Create new CommandBarControl object on the Tools menu
' and set a reference to it.
Set ctl = cb.Controls.Add(Type:=msoControlButton)
' Set properties of the new command.
With ctl
.BeginGroup = True
.Caption = "Pri&nt Invoice"
.FaceID = 0
.OnAction = "=PrintInvoice()"
.Visible = False
End With
End Sub
You refer to a command bar control by name within a command bar's Controls collection. You must use the exact case and characters specified for the command's Caption property, but you can omit the ampersand (&) that designates the command's access key. For example, to use the Execute method to carry out the Options command on the Tools menu, you use the following statement:
CommandBars!Tools.Controls![Options...].Execute
To refer to a command on a submenu, you refer to the submenu as a member of the Controls collection of the menu that contains it. For example, to use the Execute method to carry out the Add-in Manager command on the Add-ins submenu, which is on the Tools menu, you use the following statement:
CommandBars!Tools.Controls![Add-ins].Controls![Add-in Manager].Execute
The following code makes the hidden Print Invoice command created with the AddInvoiceCommand Sub procedure visible.
Private Sub ShowInvoiceCommand()
Dim cb As CommandBar, ctl As CommandBarControl
' Set a reference to the Tools menu.
Set cb = CommandBars!Tools
' Set a reference to the control.
Set ctl = cb.Controls![Print Invoice]
' Make the control visible.
ctl.Visible = True
End Sub
See Also For information on how to write and use Visual Basic functions, see Chapter 2, "Introducing Visual Basic." For more information on using Visual Basic to work with command bars, see "Microsoft Office Objects" and "Working with CommandBar Objects" in Chapter 5, "Working with Objects and Collections," or search the Help index for "command bars." For information on command bar control properties, see "Setting Properties for Command Bar Controls" earlier in this chapter.
© 1996 Microsoft Corporation. All rights reserved.
